날씨 앱을 만들기에 앞서 일단은 날씨 API를 호출해서 데이터를 받아오는 작업을 먼저하기로 했다.
내가 사용할 API는 OpenWeathermap api이다.
해당 API를 사용하는 방법에 관해서는 아래 링크를 통해서 확인해보면 될것 같다.
https://namjackson.tistory.com/27
[날씨 API 사용하기]OpenWeatherMap을 이용한 날씨 API를 사용해보자!
오픈API란? 개발을 하다보면, 내가 스스로 얻을수 없는 정보들이 있다. 버스 정보라든가 , 날씨 정보라든가 , 도서관 정보 등의 데이터들이다. 대부분 국가, 기업, 기관등에서 해당 정보들을 공유
namjackson.tistory.com
그럼 이제 API를 호출하는 방법을 알아냈으니 이제 안드로이드 스튜디오에서 API를 호출하는 방법에 대해 알아보자.
안드로이드에서 API를 호출하는 방법은 Retrofit이라는 라이브러리가 있다.
그렇담 Retrofit이란 뭔지부터 알아보자.
Retrofit이란?

Retrofit은 서버와 클라이언트간 http 통신을 원활하게 해주는 라이브러리이다.
Retrofit은 REST API를 기반으로 http 통신을 한다.
(REST API는 http 통신으로 서버와 클라이언트를 연결해주는 통신 규약이다.)
Retrofit에 대한 자세한 설명은 아래 링크를 통해서 확인해보면 될것 같다.
https://square.github.io/retrofit/
Retrofit
A type-safe HTTP client for Android and Java
square.github.io
그럼 이제 Retrofit을 사용하는 방법에 대해서 알아보자.
Retrofit을 사용하려면 아래와 같은과정을 거쳐야한다.
1. dependencies 추가 및 인터넷 권한 추가.
2. interface 생성
3. DTO 생성
4. Retrofit 객체 생성
5. 4번에서 생성한 객체를 통해서 http 통신하기
자 그럼 순서대로 한번 자세히 알아보자.
1. dependencies 추가.
일단은 Retrofit을 사용하기 위해서는 아래와 같은 dependencies를 추가해줘야 한다.
    // Retrofit(API 통신을 원활하게 해주는 라이브러리)
    implementation 'com.squareup.retrofit2:retrofit:2.9.0' //레트로핏 가장 최신 버전
    implementation 'com.squareup.retrofit2:converter-gson:2.9.0' //json 방식을 자바 클래스 방식으로 바꿔주는 역할
Retrofit 버전과 같은 경우는
https://square.github.io/retrofit/ 를 확인해보면 될것 같다.
그리고 http 통신을 하는것이기 때문에 인터넷 권한을 manifest에서 추가를 해줘야 한다.
    <!-- 인터넷 연결을 위해서 필요한 permission -->
    <uses-permission android:name="android.permission.INTERNET"/>
    <uses-permission android:name="android.permission.ACCESS_NETWORK_STATE"/>
2. interface 생성
Retrofit을 사용을 위해서는 interface를 생성 해줘야 한다.
해당 interface에서 하는 역할은 http통신을 위한 메소드들을 규정해주는 부분이다.
따라서 나는 날씨 데이터를 가져오는것이기 때문에 아래와 같이 만들어줬다.
public interface OpenWeatherAPI {
    //GET 메소드 만들었고 그거에 대한 주소는 아래와 같음
    @GET("weather")
    Call<OpenWeather> getWeather(@Query("q") String q, @Query("appid") String appid, @Query("lang")String lang);//날씨 정보를 가져오는 메소드를 선언만함, 매개변수로는 쿼리들을 받음
}
@GET() 안에 들어가는 매개변수는 GET 메소드의 주소를 넣어주면 된다.
내가 가져올 API는 아래 주소이다.
https://api.openweathermap.org/data/2.5/weather
weather 이전에 있는 주소 https://api.openweathermap.org/data/2.5/ 는 baseURL이기 때문에 따로 적어두지 않고
해당 GET API의 주소 weather 만 GET()안에 넣어준다.
그럼 이제 메소드를 만들어야 하는데 메소드의 return 타입은 Call<반환 타입> 이다.
나같은 경우는 OpenWeather 이라는 DTO를 만들었다. DTO 같은 경우는 다음 순서에 만들것이기 때문에
일단은 넘어가자.
그럼 이제 getWeather()의 매개변수 인자들에서 설명을 해보자.
내가 사용할 API의 쿼리로는 아래와 같은 쿼리를 받는다.
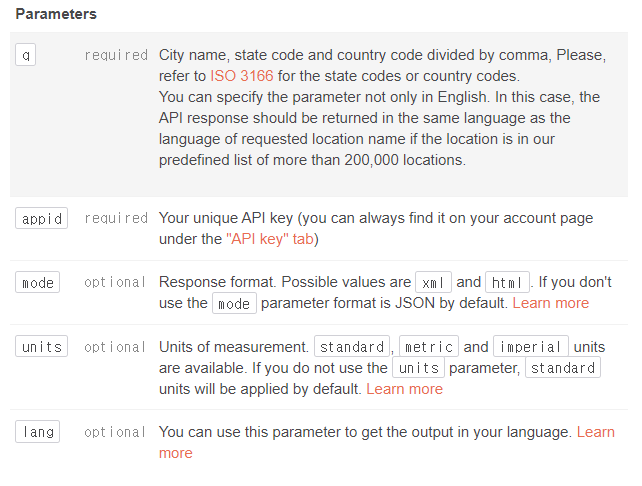
위 사진을 보면 required라고 적혀진것들은 꼭 같이 넘겨줘야 할 데이터 들이고 optional은 넘겨주지 않아도 되는
데이터들이다.
따라서 도시 정보를 나타내는 q, api 키인 appid, 리턴값 언어 나타낸 lang을 쿼리로 넘겨야 한다.
데이터는 아래와 같다.

※ api 키 같은 경우에는
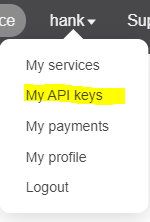
OpenWeathermap 사이트에서 마이페이지를 누르면 위 사진을 클릭해서 가져오면 된다.
따라서 interface에 적은 getWeather API는 위에서 적은 쿼리들을 받을수 있도록 매개변수를 아래와 같이 설정해준다.
Call<OpenWeather> getWeather(@Query("q") String q, @Query("appid") String appid, @Query("lang")String lang);
3. DTO 생성
DTO를 생성하기 이전에 우리가 API를 호출했을때 어떤 값들을 받는지 확인을 해야 한다.
내가 사용하려는 https://api.openweathermap.org/data/2.5/weather 같은 경우는 아래와 같은 값들을 json으로 받는다.
{
    "coord": {
        "lon": 126.9778,
        "lat": 37.5683
    },
    "weather": [
        {
            "id": 803,
            "main": "Clouds",
            "description": "튼구름",
            "icon": "04d"
        }
    ],
    "base": "stations",
    "main": {
        "temp": 297.03,
        "feels_like": 297.33,
        "temp_min": 294.86,
        "temp_max": 297.81,
        "pressure": 1009,
        "humidity": 71
    },
    "visibility": 10000,
    "wind": {
        "speed": 3.6,
        "deg": 90
    },
    "clouds": {
        "all": 75
    },
    "dt": 1630486208,
    "sys": {
        "type": 1,
        "id": 8105,
        "country": "KR",
        "sunrise": 1630443736,
        "sunset": 1630490553
    },
    "timezone": 32400,
    "id": 1835848,
    "name": "Seoul",
    "cod": 200
}
그럼 아래 값들에 대한 DTO를 만들어줘야 한다.
(DTO란 전달받은 데이터를 특정 객체에 맞게 넣을수 있게 만드는 class이다.)
내가 만든 DTO는 아래와 같다.
Clouds class
public class Clouds {
    @SerializedName("all")
    private float all;

    public float getAll() {
        return all;
    }

    @Override
    public String toString() {
        return "Clouds{" +
                "all=" + all +
                '}';
    }
}
Coords class
public class Coord {
    @SerializedName("lon")
    private float lon;
    @SerializedName("lat")
    private float lat;

    public float getLon() {
        return lon;
    }

    public float getLat() {
        return lat;
    }

    @Override
    public String toString() {
        return "Coord{" +
                "lon=" + lon +
                ", lat=" + lat +
                '}';
    }
}
Main class
public class Main {
    @SerializedName("temp")
    private float temp;
    @SerializedName("humidity")
    private float humidity;
    @SerializedName("pressure")
    private float pressure;
    @SerializedName("temp_min")
    private float temp_min;
    @SerializedName("temp_max")
    private float temp_max;

    public float getTemp() {
        return temp;
    }

    public float getHumidity() {
        return humidity;
    }

    public float getPressure() {
        return pressure;
    }

    public float getTemp_min() {
        return temp_min;
    }

    public float getTemp_max() {
        return temp_max;
    }

    @Override
    public String toString() {
        return "Main{" +
                "temp=" + temp +
                ", humidity=" + humidity +
                ", pressure=" + pressure +
                ", temp_min=" + temp_min +
                ", temp_max=" + temp_max +
                '}';
    }
}
Rain class
public class Rain {
    @SerializedName("3h")
    private float h3;
    @SerializedName("1h")
    private float h1;

    public float getH1() {
        return h1;
    }

    public float getH3() {
        return h3;
    }

    @Override
    public String toString() {
        return "Rain{" +
                "h3=" + h3 +
                ", h1=" + h1 +
                '}';
    }
}
Snow class
public class Snow {
    @SerializedName("3h")
    private float h3;
    @SerializedName("1h")
    private float h1;

    public float getH3() {
        return h3;
    }

    public float getH1() {
        return h1;
    }

    @Override
    public String toString() {
        return "Snow{" +
                "h3=" + h3 +
                ", h1=" + h1 +
                '}';
    }
}
Sys class
public class Sys {
    @SerializedName("country")
    public String country;
    @SerializedName("sunrise")
    public long sunrise;
    @SerializedName("sunset")
    public long sunset;
    @SerializedName("type")
    private String type;
    @SerializedName("id")
    private String id;
    @SerializedName("message")
    private String message;


}
Weather class
public class Weather {
    @SerializedName("id")
    private int id;
    @SerializedName("main")
    private String main;
    @SerializedName("description")
    private String description;
    @SerializedName("icon")
    private String icon;

    public int getId() {
        return id;
    }

    public String getMain() {
        return main;
    }

    public String getDescription() {
        return description;
    }

    public String getIcon() {
        return icon;
    }

    @Override
    public String toString() {
        return "Weather{" +
                "id=" + id +
                ", main='" + main + '\'' +
                ", description='" + description + '\'' +
                ", icon='" + icon + '\'' +
                '}';
    }
}
Wind class
public class Wind {
    @SerializedName("speed")
    private float speed;
    @SerializedName("deg")
    private float deg;

    public float getSpeed() {
        return speed;
    }

    public float getDeg() {
        return deg;
    }

    @Override
    public String toString() {
        return "Wind{" +
                "speed=" + speed +
                ", deg=" + deg +
                '}';
    }
}
OpenWeather Class
public class OpenWeather {

    @SerializedName("coord")
    private Coord coord;
    @SerializedName("weather")
    private List<Weather> weather;
    @SerializedName("base")
    private String base;
    @SerializedName("main")
    private Main main;
    @SerializedName("wind")
    private Wind wind;
    @SerializedName("clouds")
    private Clouds clouds;
    @SerializedName("rain")
    private Rain rain;
    @SerializedName("snow")
    private Snow snow;
    @SerializedName("sys")
    private Sys sys;

    @SerializedName("visibility")
    private int visibility; //가시성
    @SerializedName("dt")
    private long dt; //데이터 계산 시간
    @SerializedName("timezone")
    private int timezone; //UTC에서 초단위로 이동
    @SerializedName("id")
    private long id; //도시 id
    @SerializedName("name")
    private String name; //도시이름
    @SerializedName("cod")
    private int cod; //내부 매개변수

    public Coord getCoord() {
        return coord;
    }

    public List<Weather> getWeather() {
        return weather;
    }

    public String getBase() {
        return base;
    }

    public Main getMain() {
        return main;
    }

    public Wind getWind() {
        return wind;
    }

    public Clouds getClouds() {
        return clouds;
    }

    public Rain getRain() {
        return rain;
    }

    public Snow getSnow() {
        return snow;
    }

    public Sys getSys() {
        return sys;
    }

    public int getVisibility() {
        return visibility;
    }

    public long getDt() {
        return dt;
    }

    public int getTimezone() {
        return timezone;
    }

    public long getId() {
        return id;
    }

    public String getName() {
        return name;
    }

    public int getCod() {
        return cod;
    }

    @Override
    public String toString() {
        return "OpenWeather{" +
                "coord=" + coord +
                ", weather=" + weather +
                ", base='" + base + '\'' +
                ", main=" + main +
                ", wind=" + wind +
                ", clouds=" + clouds +
                ", rain=" + rain +
                ", snow=" + snow +
                ", sys=" + sys +
                ", visibility=" + visibility +
                ", dt=" + dt +
                ", timezone=" + timezone +
                ", id=" + id +
                ", name='" + name + '\'' +
                ", cod=" + cod +
                '}';
    }
}
이렇게 DTO를 만들어줬다.
DTO를 만들때 제일 중요한 점은 @SerializedName() 에서 안에 들어갈 값들은
실제로 전달 받은 값들의 변수명과 똑같아야 한다.
그래야지만 api 통신이 완료되었을땐 해당 값들을 찾아서 값들이 들어가게 된다.
4번 과 5번 과정은 아래 링크를 통해서 확인해보면 된다.
https://wpioneer.tistory.com/188
날씨 앱 만들기 : Retrofit을 사용하여 날씨 API 호출하기 2(Java / MVVM)
저번 글에서는 아래 순서중 3번까지만 진행을 했으니 이번 글에서는 4번부터 시작을 해서 마무리를 지어보려고 한다. 1. dependencies 추가 및 인터넷 권한 추가. 2. interface 생성 3. DTO 생성 4. Retrofit
wpioneer.tistory.com
'코딩일기 > 날씨앱 만들기 프로젝트' 카테고리의 다른 글
| 날씨 앱 만들기 : 기상청 API 분석 및 현재 시간 날씨 정보 받기 (0) | 2021.09.11 |
|---|---|
| 날씨 앱 만들기 : 위도와 경도 기상청 격자 정보 X,Y 로 변환 (Java) (0) | 2021.09.09 |
| 날씨 앱 만들기 : 안드로이드 GPS 정보 받아오기 (0) | 2021.09.08 |
| 날씨 앱 만들기 : 기상청 api 사용하기( Service 키 인증 실패 오류) (2) | 2021.09.07 |
| 날씨 앱 만들기 : Retrofit을 사용하여 날씨 API 호출하기 2(Java / MVVM) (0) | 2021.09.01 |


